Saturday, August 29, 2015

Filters in Gmail

Ever wish you could have an email get automatically marked as unread in your inbox?  Maybe you would like an email to get labeled a certain way automatically instead of having to label it yourself?  Want a particular email to go straight to your deleted items, because no matter how many times you hit "unsubscribe" they just keep coming?  Well, you can, and it's easier than you think!

You can create filters in Gmail with just a few clicks.  To start out, the easiest thing to do is to select an email in your inbox, or actually open an email, either way - you will see the "More" option appear on the bar across the top of your inbox.  Click on "More" and choose "Filter messages like these".  It is good to choose an email that you'd actually like to filter, because it will autofill the senders email address, but it doesn't matter which email you use to get to the filter, because you can change all of the information anyway.


Once you click the "Filter messages like these" option, you will get a window that pops up where you can enter in all the information about what you'd like the filter to do.  The first set of options is for how to identify the emails you'd like to be filtered.


As I said, it will autofill the sender's email address, but you can change that to be whatever you'd like it to be, or even leave it blank.  You can have it filter by who an email is from, who it is to, what the subject is, what words are contained in the email, whether it has an attachment or not, what size the email is, etc.  Once you have entered in at least one of those identifiers, you can click the blue "Create filter with this search" link at the bottom right.  This will take you to the next set of options asking you what you'd like Gmail to do with the emails that fit the criteria you just set.  


You can have Gmail do all of the things you see listed.  One way that I use filters is to apply labels to an email.  To read about what labels are and how to create and use them, read my Labels in Gmail post.  If I want the email to be labeled and stay in my inbox, then that is the only option I choose.  If I want the email to be labeled and not be in my inbox, I can choose the option to apply a label, and also choose the option to "Skip the Inbox (Archive it)".  This will put the email in my "all mail" section but not in my inbox.  I can still access the email by searching for it, or by clicking on the label I asked Gmail to give it before it was archived.  I do this with newsletters so that they don't clutter up my inbox, but I can easily go to that label and read them whenever I have time.  

There are many reasons why you might create filters, as you can see by the list.  Once you have let Gmail know what you'd like it to do with the emails you identified, you can click the blue "Create filter" button.  You can choose the check box to apply it to the emails already in your inbox if you so desire.  

To edit or delete a filter after you have created it, or to see a list of all the filters you have created, click on the gear icon in the upper right hand corner of your inbox and choose "Settings".


Then find and click on the "Filters" tab across the top of the settings window.


I've blanked out my filter details to protect my privacy, but you'll see here that you can click on "edit" or "delete" on the right.  You can also click on "Create a new filter" at the bottom of your list.  There is currently no limit to how many filters you can create.  (You can only have 20 filters at a time that forward emails to another address.)

As you can see, it is pretty simple to create filters.  You can use them to save time and help organize email flow.  I have about 15 filters in use for my school account right now.  

I hope you found this helpful.  Happy filtering!

Stop by again soon for more helpful tech tips.

Sign in to Google Chrome

It's no secret that my favorite internet browser is Google Chrome.  Some people like it, some people don't.  If you are going to use it, you should sign in.  Many people are using Chrome, but they aren't getting all the benefits of using it because they aren't signed in.  You may be signed in to Google, but not be signed in to Chrome.

To see if you are signed in to Chrome or not, click on the three dots menu on the top right side of your browser and click on "Settings".


If you are signed in to Chrome, at the top of the Settings page you can see who you are signed in as.


If you are not signed in to Chrome, it will give you a "Sign in to Chrome" button.


Click on the button and go ahead and sign in using your Google Account.  You will probably get a window that asks if you want to "Link your data".  This is where the magic happens.  If you are using a computer you will use frequently - one that is not a public use computer, then it is safe to link your data.  This means that all of your bookmarks, Chrome extensions and apps, and your settings will travel with you.  It is a wonderful thing!  I have my school account data linked on my work computer, my work Chromebook, and my home computer.  All three will keep my current bookmarks, extensions, and settings so that I can move seamlessly between devices.

Another nice thing is that you can create profiles for Google Chrome.  Between my husband and I, we have about 10 Google Accounts - some are work, some are personal.  We have Chrome set up so we can simply change profiles with a few clicks to be logged in to all those accounts - each one with its own bookmarks, extensions, settings, etc.  This can be handy if you want to access your work email or Google Drive at home or your personal email or Google Drive at work.

To add another profile on Chrome, click on the three dots menu and click "Settings".  In the top section, click "Manage other people".


A window will come up that shows all of your Chrome profiles.  At the bottom right you can click, "Add Person".


When you click "Add Person" it will open a new browser window and have you log in to your Google Account just like you did when you signed in to Chrome the first time.  You will again want to choose to "Link your data".  You can even choose an icon or picture to go with each profile.  You can name each profile as well.

To change the name or icon of your profile, you must be logged in under that profile.  Then go to the three dots menu and click "Settings".  Near the top where you see who you are signed in as, there is a little right arrow icon.  Click on that icon.


You can change the name and/or icon for your profile. 


Once you have more than one profile in Chrome, you can easily switch back and forth between them.  For a Mac, look at the bar across the top of your screen when you have Chrome open.  One of the options will say "People".  If you click on that menu, you can easily choose which profile you'd like to use.  For a PC, you should see the name of your current profile in the upper righthand corner of the browser window.  If you right click on that name, you will see the list of all your Chrome profiles and you can choose the one you'd like to switch to.  

Having different profiles makes it very easy when you need access to more than one Google Account on your computer.  Remember though - you want to always be sure you are doing this on a computer that is specifically for your use.  Doing this on a public computer could put your account and information at risk.  Creating different profiles instead of just switching between Google Accounts will help keep your information straight and you won't have any access issues because Chrome is trying to use the wrong account to access a file.

I hope you find this helpful!  Stop in again soon for more handy tech tips!

Wednesday, August 19, 2015

Making a Signature in Gmail

Get tired of typing your name at the bottom of every email?  Envious of your colleague's email signature, but just never get around to asking how to do it?  No problem.  It's easy!

From your inbox, click on the gear icon on the top right corner and click settings.


Scroll down until you see the section for "Signature".

Click in the box and type in the signature you'd like to have.  I have my name, title, email, and phone number.  I also have a school logo in mine, but you'll have to decide what works best for you.  You can copy and paste the image in if you'd like, or you can upload it from your computer by clicking on the image icon (the one that looks like a mountain range).  You can choose the font, size, color, and format that works best for you.


I generally like to click the check box for putting the signature before any quoted text in a reply.  That way it shows up after my message when I reply, instead of all the way at the bottom of the email chain.

Here is the step you can't forget!  Scroll all the way to the bottom of the page and click "Save changes" or else it will not save your signature.


That's it!  Done!

I hope you found this helpful.  Stop by again soon for more handy tech tips!

Saturday, August 15, 2015

Two Keyboard Shortcuts I Can't Live Without

These two keyboard shortcuts are life savers!  I use them daily.

Ctrl-Shift-V (Command-Shift-V for Mac)

If you use Ctrl-C to copy, Ctrl-X to cut, and Ctrl-V to paste, this one is for you.  Ctrl-Shift-V (Command-Shift-V) will allow you to paste using source formatting.  That means it will match the formatting of the document you are pasting into.  For example - I am typing an email and I want to copy some text from a document or website that is using a fun font and green text.  I want the text to be black and in the same font and size as the rest of my email.  If I use Ctrl-V to paste, it will most likely keep the font, color, size, and line spacing from where I found it.  If I use Ctrl-Shift-V, it will match the font, color, size, and line spacing of my email.  Talk about a time saver!

Holding Shift while Making a Shape

In apps like Google Drawings and Google Slides, when you make a shape like a square or a circle, there are times when you don't want it to shift into a rectangle or a circle, you want it to maintain its shape as a perfect square or circle.  If you hold the shift key down while you draw the shape, it will stay true.  For a triangle, it will keep it equilateral or isosceles, depending on the one you chose to make.  For an arrow or a line, it will keep it straight and not let it become slanted.  If you drag up or down far enough, it will snap to a diagonal, but it will prevent you from doing the slightly not straight line.  This is a life saver for making all my tutorials!  I know it works in Drawings and Slides, and also in Preview on a Mac.  Try it in whatever program you use that makes shapes or lines and see if it works - I bet it will!  

Both of these tips saved me a bunch of hassle once I learned them.  I hope they save you some time and hassle too.


Sunday, August 9, 2015

Assignment Dropbox using Google Forms

Once student assignments started going digital, I was thrilled.  I no longer had to carry 25 writer's notebooks, book reports, essays, or poster projects home and back again for grading.  It seemed I would be much more organized without much effort.  That was mostly true.  Having many of our assignments go digital was great.  I could access the files from home or wherever else I wanted without carrying large amounts of paper around.  However, there did seem to be a bit of a hassle in finding all the flies.  I had to set up a plethora of folders in Google Drive and set up all the sharing rights.  Maybe I chose to just have students share files with me instead, so I had to dig through copious amounts of shared files to find the ones I needed.  While both of those ways can work, and can work well, I was looking for something a little different.  Tools like Google Classroom can make this process easier, but not every assignment is something that can be saved in a Google Drive.  What if it is just a link?  Do I have the students email me each link?  What if your students don’t have email?  That can be a hassle at times also.  I was still mulling this all over when a presenter I had at a Google Summit event solved my problem.  Sergio Villegas introduced me to the assignment dropbox using Google Forms.

I'm very excited to let you know that Sergio is co-authoring this blog post about his assignment dropbox.  The form that Sergio uses is geared more toward older students, so I made some modifications to it before I used it with my third graders.  I'll tell you a bit about the form I created and how I use it in my classroom, and then I'll turn it over to Sergio who will speak about it from a high school perspective.

I created a very simple Google Form to use as my dropbox.  If you aren't familiar with creating a Google Form, you may want to check out my Google Forms 101 post.  I have only 4 questions on the form.  Student name, assignment title, what action they want me to take regarding their assignment, and a place for them to paste a link for an assignment that is not a Google Doc.


You may want to have them paste in links for all assignments, but I chose not to.  We use Hapara Teacher Dashboard, which allows me full access to my students' Google Drives from one screen.  I can go in and easily view student work and it is automatically shared with me when I click on it through this system.  Instead of having my students share the documents and then paste in the links, I just go and grab their file from my Teacher Dashboard.  You'll have to decide what works best for you when you make your assignment dropbox.

I only have one class and this year I don’t have any students with the same first name, so I only have them type in their first name for the “Name” prompt.  You can require last name or last initial if your situation requires that.  Sergio also mentioned to me that a great option for younger students is to create a drop down menu with all the student's names so they can just pick their name instead of typing it.  This can also help save time typing if your students are working on iPads or other tablet devices.

You'll also notice that I used a drop down menu for assignment name.  Some like to use multiple choice for this instead.  I just like the way that the drop down looks.  You can pick whichever you like best.

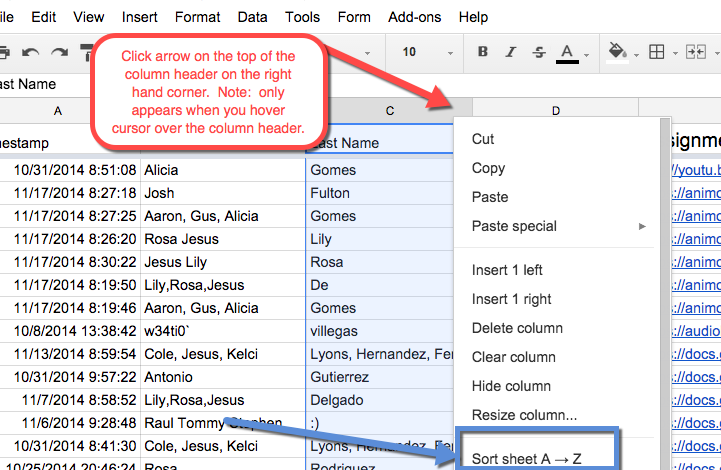
My students know that when they finish their assignment, they need to "turn it in" by going to this form.  The link never changes, even when I go in to change the assignment titles as we move through the year.  I post the link on my class website and they know exactly where to go, every time.

By requiring the students to use this form, I now have a spreadsheet in my Google Drive that tells me who is finished with which assignment and what they need me to do with it.  It also helps me to respect their time, because I grade them in the order they were turned in.  I color code my rows once I look at them, so I know if they are working on corrections, needed to start over, need a face to face conference, etc.  You can also use conditional formatting on your Google spreadsheet to have it color code some things for you.  I'll have instructions coming for that in a later blog post.  For instance, all assignments that are marked final draft, get colored red automatically.


The blank column you see is where their names go.  I hid them before I took the screenshot for privacy reasons.  The column all the way to the right would be where the links would show up when they paste them in, but I hid those for privacy reasons as well.  

Even my young students got the hang of this very easily at the beginning of the year.  It has been a really great tool to help me streamline the process of grading digital work.  I can only imagine how much easier it makes things when you have older students turning in a variety of digital assignments.  Sergio can speak to that from his perspective.

Hi all, Sergio here, since Cynthia did a solid job building up the background knowledge, I’m gonna add a few things to consider for my secondary peeps out there, as well as sharing one purpose comment.

I love the Form Dropbox, I have been incorporating it in my classroom since my old days before my students had GoogleEDU accounts, and although I now have access to Hapara Teacher Dashboard, Google Classroom, and Haiku Learning LMS, I still find a place for an assignment dropbox because of the ability to:

1.  Collect anything from the web that my students find, create, or add to.
2.  Everything collected lives on one, easily sortable, automatically hyperlinked, spreadsheet*.

*note:  number two is where the magic happens in my book.


With this in mind, here is a list of secondary tips, followed by 3 assignment suggestions that are worth giving a shot if you are new to the digital assignment game.

Tips:
  • I like multiple choice, I only keep about 3 assignment topics up there at a time.  If the assignment name no longer appears on the form, the student cannot turn it in.  When I add a new assignment (say a longer creation task) I’ll add it to the form and that means the window of time to turn it in is now open.
  • Sort by last name (say during parent meetings, back to school night, IEPs etc.) to see all of a single student’s work quickly (note this works better if each period has their own form).
  • Option for Multiple Sections: Make a form for each period.  
  • Want to be really organized?  Start a new Form each unit, this way you have a spreadsheet collecting content.  After a while I don’t need to be able to quickly retrieve some of that older content.  In general the spreadsheets can get pretty big so starting a new one is a good idea anyway.  May as well be organized about it.
  • I add another column on the spreadsheet that I add to for whatever purpose the instructor may have in taking notes about the work.  I use this for scoring assignments so I have a record right there, but it can just as easily be used for feedback.
  • Want to start using high end spreadsheet stuff?  Start collecting emails also so that you can use stuff like formemailer to send information back to students and it will all be automated at the push of a button!
  • Google Classroom does some of this, but there are still deficiencies, so with this in mind, consider the following:
    • It is much faster for me the instructor to see all links for all students on one page.  
    • I still use classroom for Google Doc stuff because it’s awesome, I use the assignment dropbox for collecting most other things that involve web links of some sort, and anything informal.
    • I really like having students curate content (find me a bunch of images related to _____, or find me videos less than 4 min on specific content ideas, etc.) so that I now have a vast library of cool stuff I didn’t have to search for.
    • Once things are on a spreadsheet, there are a million cool things that you can do with the information collected, and automate workflow.  So this is a good way to get familiar with spreadsheets before you move to the advanced stuff.

Thank you so much, Sergio, for speaking to this from the high school perspective.  I appreciate you sharing the idea with me in the first place, and then being willing to be a guest on the TeachingTechNix blog!  You can click here to see a video Sergio made about the assignment dropbox he uses with his older students.

Sergio and I hope that this information was helpful to you.  Using Google Forms this way is a really great way to stay organized.  Try it...you’ll wonder how you ever did without it!

Helping teachers incorporate technology, one tech tip at a time.