Showing posts with label Gmail. Show all posts
Showing posts with label Gmail. Show all posts
Thursday, February 11, 2016
Send Personalized Emails to Your Whole Class
Have you ever needed to email all of your students (parents or colleagues) and include personalized information in each email? I'm not sure about you, but I don't have time to sit down and send that many individual emails. Thankfully, using Google Sheets, we don't have to! Using an Add-on for Google Sheets called formMule, you can easily personalize information in a batch of emails and send them all at once. Watch this short video to see how.
Friday, November 20, 2015
Gmail: Using the Star
That little star next to your emails in the inbox can be a useful tool. It can remind you of things to follow up on. It can also help you mark emails you don't want to lose track of. With a little tweak to your settings, it can help you do a whole lot more.
The basic way to use the star to mark an email is to just click on the star. That will make it turn yellow.

Now when you click on the "Starred" section in the navigation down the left of your inbox screen, you will see all of the emails you have starred.

To remove a star from an email, simply click the star icon again. There are a few more options available for stars if you go into your settings. Click on the gear icon at the top right of your inbox and choose "Settings".

Now scroll down until you see the section for "Stars".

You can see that you have quite a few more options. Chances are you have just one star in use. If you click on the "4 stars" preset, it will look like this:

You can also choose to use "all stars" or simply click on the ones you'd like to use and drag them into the "in use" section.

Once you decide what you'd like, you can scroll to the bottom of the page and click "Save changes". If you chose to have more than one star, you can now click the little star icon for an email and it will be the yellow star, but if you click it again it will change and each click allows you to "scroll" through the star icons you have in play. Once you set the icon and click away to something else, when you click the icon again it will remove the star from the email.
Stars can be a great way to add a layer of organization to your inbox.
Thanks for stopping by. Come back again soon for more handy tech tips!
Monday, November 16, 2015
Gmail Inbox: Change The Spacing
Did you know you could change the spacing on your Gmail inbox?
You have three choices:
Comfortable - a good amount of space between emails
Cozy - in the middle
Compact - emails are tight together so you can see more on the page
You can change it with one easy step.
Click on the little gear icon on the upper right hand corner of your inbox and you will see all three options. Click on the one you want. I put all three options below so you can see the difference. The default is comfortable, so you are probably already set to that one.
Comfortable

Cozy

Compact

You can pick whatever works best for your vision and your productivity.
Tuesday, September 22, 2015
Gmail - Undo Send
Ever wish you could hit undo after sending an email? Maybe you sent it to the wrong person, or you accidentally hit send before you were finished? With Gmail - you can!
To enable the undo send feature, click on the gear icon in the top right hand side of your Gmail inbox and select "Settings" from the menu.

Scroll down until you see "Undo Send" and click the box to enable it. You can then use the drop down to set your desired time frame for the undo. You will only have that amount of time to click undo before you lose the option.

Scroll to the bottom of the page and click the "Save changes" button.
Now when you send an email, you will get the normal message at the top of your screen that lets you know the message has been sent, but now it will include a link to undo. After the time frame you selected has passed, the undo link will disappear.

To enable the undo send feature, click on the gear icon in the top right hand side of your Gmail inbox and select "Settings" from the menu.

Scroll down until you see "Undo Send" and click the box to enable it. You can then use the drop down to set your desired time frame for the undo. You will only have that amount of time to click undo before you lose the option.
Scroll to the bottom of the page and click the "Save changes" button.
Now when you send an email, you will get the normal message at the top of your screen that lets you know the message has been sent, but now it will include a link to undo. After the time frame you selected has passed, the undo link will disappear.
The reason you only have a certain time frame to undo the send, is because it isn't actually sending your email when you hit send. It waits for the time frame you selected before it sends the email, which is what gives you the chance to undo the send.
This feature has come in handy for me several times! I hope you find it helpful as well.
Saturday, August 29, 2015
Filters in Gmail
Ever wish you could have an email get automatically marked as unread in your inbox? Maybe you would like an email to get labeled a certain way automatically instead of having to label it yourself? Want a particular email to go straight to your deleted items, because no matter how many times you hit "unsubscribe" they just keep coming? Well, you can, and it's easier than you think!
You can create filters in Gmail with just a few clicks. To start out, the easiest thing to do is to select an email in your inbox, or actually open an email, either way - you will see the "More" option appear on the bar across the top of your inbox. Click on "More" and choose "Filter messages like these". It is good to choose an email that you'd actually like to filter, because it will autofill the senders email address, but it doesn't matter which email you use to get to the filter, because you can change all of the information anyway.

Once you click the "Filter messages like these" option, you will get a window that pops up where you can enter in all the information about what you'd like the filter to do. The first set of options is for how to identify the emails you'd like to be filtered.

As I said, it will autofill the sender's email address, but you can change that to be whatever you'd like it to be, or even leave it blank. You can have it filter by who an email is from, who it is to, what the subject is, what words are contained in the email, whether it has an attachment or not, what size the email is, etc. Once you have entered in at least one of those identifiers, you can click the blue "Create filter with this search" link at the bottom right. This will take you to the next set of options asking you what you'd like Gmail to do with the emails that fit the criteria you just set.

You can have Gmail do all of the things you see listed. One way that I use filters is to apply labels to an email. To read about what labels are and how to create and use them, read my Labels in Gmail post. If I want the email to be labeled and stay in my inbox, then that is the only option I choose. If I want the email to be labeled and not be in my inbox, I can choose the option to apply a label, and also choose the option to "Skip the Inbox (Archive it)". This will put the email in my "all mail" section but not in my inbox. I can still access the email by searching for it, or by clicking on the label I asked Gmail to give it before it was archived. I do this with newsletters so that they don't clutter up my inbox, but I can easily go to that label and read them whenever I have time.
There are many reasons why you might create filters, as you can see by the list. Once you have let Gmail know what you'd like it to do with the emails you identified, you can click the blue "Create filter" button. You can choose the check box to apply it to the emails already in your inbox if you so desire.
To edit or delete a filter after you have created it, or to see a list of all the filters you have created, click on the gear icon in the upper right hand corner of your inbox and choose "Settings".

Then find and click on the "Filters" tab across the top of the settings window.

I've blanked out my filter details to protect my privacy, but you'll see here that you can click on "edit" or "delete" on the right. You can also click on "Create a new filter" at the bottom of your list. There is currently no limit to how many filters you can create. (You can only have 20 filters at a time that forward emails to another address.)
As you can see, it is pretty simple to create filters. You can use them to save time and help organize email flow. I have about 15 filters in use for my school account right now.
I hope you found this helpful. Happy filtering!
Stop by again soon for more helpful tech tips.
Wednesday, August 19, 2015
Making a Signature in Gmail
Get tired of typing your name at the bottom of every email? Envious of your colleague's email signature, but just never get around to asking how to do it? No problem. It's easy!
From your inbox, click on the gear icon on the top right corner and click settings.

Scroll down until you see the section for "Signature".
Click in the box and type in the signature you'd like to have. I have my name, title, email, and phone number. I also have a school logo in mine, but you'll have to decide what works best for you. You can copy and paste the image in if you'd like, or you can upload it from your computer by clicking on the image icon (the one that looks like a mountain range). You can choose the font, size, color, and format that works best for you.

I generally like to click the check box for putting the signature before any quoted text in a reply. That way it shows up after my message when I reply, instead of all the way at the bottom of the email chain.
Here is the step you can't forget! Scroll all the way to the bottom of the page and click "Save changes" or else it will not save your signature.

From your inbox, click on the gear icon on the top right corner and click settings.

Scroll down until you see the section for "Signature".
Click in the box and type in the signature you'd like to have. I have my name, title, email, and phone number. I also have a school logo in mine, but you'll have to decide what works best for you. You can copy and paste the image in if you'd like, or you can upload it from your computer by clicking on the image icon (the one that looks like a mountain range). You can choose the font, size, color, and format that works best for you.

Here is the step you can't forget! Scroll all the way to the bottom of the page and click "Save changes" or else it will not save your signature.
That's it! Done!
I hope you found this helpful. Stop by again soon for more handy tech tips!
Sunday, January 11, 2015
Labels in Gmail
The most common complaint I hear from people when they switch from Outlook to Gmail is that they miss the folder structure Outlook provides. It's true, Gmail doesn't have folders. Gmail does us one better - labels.
 -
-


When you apply a label to an email, it stays in the inbox with a little label added to it. It isn't removed from the inbox like it was in Outlook when you put it into a folder. If you don't want the email to show in your inbox list, you can archive it. Once archived, an email will show in the "All Mail" list, but not in your inbox. To archive an email, either select the email using the check box on the left, or open the email and then click the Archive button across the top of the screen. It looks like a little file folder. Your email will still be accessible to you during searches when it is archived.
*UPDATE* If you select an email in your inbox and click and drag the email into one of the labels on the left side navigation list, it will automatically archive your email and label it so it no longer shows in your inbox. You can also select the "Move" option and choose a label which will do the same thing.


The biggest thing that makes labels better than folders, is that you can put as many labels as you want on one email. With a folder system, an email can only be in one folder. Gmail allows you to create labels - up to 5,000 - and even make sub-labels. You can name your labels whatever you like and also color code them.
Creating a New Label
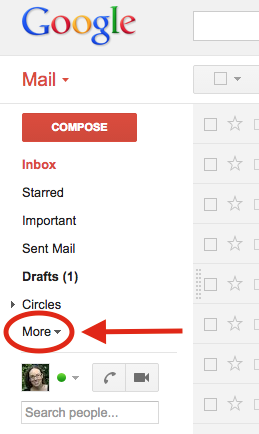
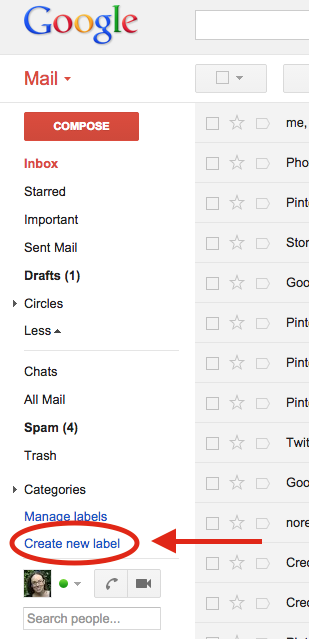
To create a label, find "Create new label" in the list under the red "Compose" button down the left side of your inbox. It will be pretty far down the list. Chances are you will need to click the "More" option before "Create new label" will show.
To create a label, find "Create new label" in the list under the red "Compose" button down the left side of your inbox. It will be pretty far down the list. Chances are you will need to click the "More" option before "Create new label" will show.
-
You'll get a pop up window asking what you'd like to name your label. Once you type the name of your label, you can hit the "Create" button. If you want this label to be a sub-label, you can click the box next to "Nest label under:" and then use the drop down to choose the label you wish to create it under. One example for how you might use the sub-label feature is with parent emails. You may want to create a "14-15 Parent Emails" folder and then sub-labels might be things like "Sent", "Received", "Meetings", "IEP", etc.
Once you hit create, you should see your label appear in the list down the left side of your inbox. You may have to click the "More" button to see your label in the list.
Managing Your Labels
You can control which labels show up in this list. To access those settings, click on "Manage labels" in the list right above where you clicked to create your label.
You can also get to these options by clicking on the little gear button on the upper right side of the inbox screen and choosing "Settings" and then click "Labels" from the options across the top of the screen.
Now you can choose to show or hide each label - even the Gmail created ones! You'll have to scroll all the way to the bottom of the list to see the ones you have created.
Applying a Label to an Email
There are two ways to apply a label to an email. You can do it by checking the box to the left of the email to select it, or by opening the email. Either way, you will then see a little label button appear across the top of the screen. It looks like a little tag. If you click on this button, it will allow you to select a label. If you do not see the label you created in this list, simply start typing the name of your label into the search box and you will be able to select it. Once you select it once, it should show up in that list each time you click the label button. You'll see that you can create new labels and access your label settings from this list as well.
Once you select the label you want, you will see an "Apply" button appear at the bottom of the label list. Click on "Apply" and your email is now labeled.
You will now see the label appear on your email in the inbox list.
Remember, you can apply as many different labels to an email as you wish.
Color Coding Your Labels
You can change the color of your labels, as well as access some of the settings we've already discussed, by mousing over your label name down the left side of the inbox and clicking on the little down arrow that appears just to the right of the label.
When you change the label color, it will always make the label with that name in the color you chose. If I changed the Tech Stuff label to be blue, it will always show up in blue.
Accessing Labeled Emails
*UPDATE* If you select an email in your inbox and click and drag the email into one of the labels on the left side navigation list, it will automatically archive your email and label it so it no longer shows in your inbox. You can also select the "Move" option and choose a label which will do the same thing.
If you want to see all the emails you have placed under a specific label, weather they have been archived or not, click the name of the label in the list down the left hand side of your inbox.
You can do a Gmail search specifically for emails with a certain label by typing "label:" followed by the name of your label, into the search bar across the top of your inbox. For example, if you know you had an email from Sam about homework that you labeled with the "Parent Emails" label, then you can do a search like this:
To read more about harnessing the power of the Gmail search bar, read my post on Searching in Gmail.
Well, there you have the basics of labeling. Go ahead and give it a try!
Thank you for stopping by the TeachingTechNix blog! Drop by again soon for more handy tech tips!
Sunday, January 4, 2015
Searching in Gmail
One of the biggest complaints I heard from people when our school switched from Outlook to Gmail, was that they couldn't make folders anymore. I told everyone not to worry, because Gmail provides users with a labeling system. I think it's even better than folders because you can give one email multiple labels, whereas you could only put an email in one folder in Outlook. You can create up to 5,000 labels and even make sub-labels. I'll be making a post about labels in the near future, but today I wanted to share with you about Gmail's amazing search feature. It is so amazing in fact, that I don't even use labels.


At the top of your screen in Gmail you will see a search window. You've probably even used it before. You can type in a person's name, the subject of an email, or even a keyword to find the email you are looking for. One you thing you may not have noticed though, is the little down arrow on the right edge of the search bar.
This little arrow adds a lot of power to your search. It allows you to search more specifically. When you click on it, you get a bunch of options for your search.
You can choose what section of your mailbox you want to search in (All Mail, Inbox, Trash, Spam, Read Mail, Sent, Drafts, etc.) You can enter a name or email address of a specific sender or of the person you sent the email to, you can search for a specific subject, or for particular words. You can even search for an email that doesn't have a particular word or words. One especially useful thing is the little check box for "Has attachment". You can specify a size and even a date range, too. It is pretty handy if you ask me.
You can also use some advanced search operators to narrow down your search without clicking the arrow and using the drop down.
When you are typing into the search bar, you can use these advanced search operators to help you:
Operator
|
Purpose
|
Example
|
to:
|
use this to specify the recipient of the email
|
to:mark
to:mark@mark.com
|
from:
|
use this to specify the sender of the email
|
from:mark
from:mark@mark.com
|
subject:
|
use this to search for words in the subject line of the email
|
subject:meeting
subject:Friday
|
label:
|
use this to search for emails you know you have labeled
|
label:PLN
label:parents
|
has:attachment
|
use this to search for an email you know has an attachment
|
has:attachment
|
filename:
|
use this to search for an attachment with a specific name or file type
|
filename:Thursdayhomework.doc
If you know the file type, but not the exact name, you can simply search for the file type
filename:pdf
|
in:
|
use this to search a specific area of your mailbox
|
in:inbox
in:all mail
in:sent
|
after:
before:
|
use these to specify a date range
you can use them together, or individually
(use the date format yyyy/mm/dd)
|
after:2014/12/15
before:2015/01/03
|
If you want to get a bit more technical, you can click here to see some other advanced search operators on Gmail's support page.
For example, if I wanted to search for an email from Heather about homework that has a pdf attachment and was sent before December 1, 2014, it would look like this:
I'm assuming here that I wasn't positive the word homework was in the subject line. If I was sure of that, then I would have used subject:homework instead of just typing the word homework.
One thing you'll want to keep in mind is that Gmail search doesn't recognize special characters like &, *, ( ), [ ], and $.
One thing you'll want to keep in mind is that Gmail search doesn't recognize special characters like &, *, ( ), [ ], and $.
I know I use these search operators often when I'm hunting for emails. I hope they come in handy for you as well!
Thank you for stopping by the TeachingTechNix blog! Stop by again soon for some more helpful tech tips.
Monday, December 22, 2014
Easy Way to Filter in Gmail
Everyone wants your email address these days. You sign up for this, for that, and for the other thing and the next thing you know, each morning greets you with 15 unread emails you don't care to read. Every once in a while you actually want one, so you don't want to tell Gmail to delete them all when they arrive, but you don't really want to deal with them on a daily or weekly basis either. Gmail has a good filtering system, and you can create filters and have Gmail do whatever you like with them. This works great, but some companies have different variations of the email address they are sending from, and some messages may make it through without getting caught by the filter. I have a solution that will help the filters in Gmail become more effective for you.


You can add a + and then whatever word you want to your email address, and it will still come to you. You can do this with any Google Apps account. For instance, my email is cynthia@teachingtechnix.com. If I am signing up at a retail store, or online at someplace like Pinterest for example, when I sign up on their form, I will list my email address as cynthia+Pinterest@teachingtechnix.com. The emails will still come to me, but I can tell Gmail to take any message sent to cynthia+Pinterest@teachingtechnix.com, which should be ALL the emails they ever send me, and mark them all as read, or archive them, whatever I wish to do with them. No matter what words are in the messages, no matter which email address they come from, all the messages from Pinterest will get caught by the filter. Neat, huh?
To set up your filters, you will need to select an email. It doesn't have to be one from the person or organization you wish to filter, but it's ok if it is. Whether you simply select the email by clicking the check box to the left of the sender in your inbox, or you actually open the email, your instructions will be the same. Once you do one of those two things, click on the "More" button at the top of the screen and click on "Filter messages like these". (If you click on the "More" button before you either select the email or open it, you will not have the option you need.)
Once you click "Filter Messages like these", you will get a box with options for your filter. The "From" box will be autofilled with whoever the sender of the email is that you selected. It will also say "from:" and list the sender at the very top of the option box. It doesn't matter who it is, because you need to delete everything in the from box anyway. We are going to set up the filter to look at who the email is sent to, not who it is from.
Let's say I signed up at Pinterest with the email address cynthia+Pinterest@teachingtechnix.com. (Oh how I wish I'd known about this feature long ago! You can bet I'll be updating some email addresses!) I want everything sent to that email address to be marked as read and archived. That way, I can search for emails from Pinterest and look at them when I so choose and they won't clutter up my inbox. To do this, I want to delete anything that is in the "From" box and type whatever email I signed up with into the "To" box. Then click "Create filter with this search" at the bottom right corner of the box.
You'll notice that the very top of the option box will update and now show that you are making a filter using "to" the email address you listed, instead of "from" the address in the email you selected to start the process. Here is where you can choose what you want Gmail to do with the emails that come in. I like to "Skip the Inbox (Archive it)" and "Mark as read", but you can do whatever you like. If you look at the green arrow below, you can also add a label to the message. I'll cover labels in a future blog post. If you already use labels, this is where you would add a label to the incoming message if you wanted to. Once you have selected the options you want, click on the blue "Create filter" button at the bottom left. If you already have emails from this specific organization that were sent to the email address you are trying to filter, you'll want to make sure you check the box next to "Create" that says "Also apply filter to matching conversations". That way the filter will catch these emails as well.
Once you click "Create filter", you are all done! Your filter is created and now any new emails that are sent to that specific email address will do whatever you selected in your filter.
If you need to go back and edit your filter in the future, click on the gear box in the upper right hand corner of your inbox and click "Settings".
Across the top, select "Filters".
You will then see any filters you have created and you can edit or delete them as you please.
That's it! Simple, but very cool! I saw my husband do this at Ikea the other day and could not believe I didn't know about it sooner. I think it's pretty handy!
Thank you for stopping by the TeachingTechNix blog. I hope you found this little tip helpful! Stop by again soon for some more handy tech tips!
Monday, September 8, 2014
Daily Reminder Lists With Gmail's Tasks Feature
As a teacher, there are things I need reminders of on certain days of the week, every week. Recess duty, printing certain weekly assignments, Johnny's pull out at 2:00, etc. I could use Microsoft Outlook reminders, but I'm a Google Apps user, so I don't use Outlook anymore. I could use the reminders on my smart phone or iPad, but I don't need it to make a sound, nor do I want to be checking my phone all the time in front of my students. I don't need an audible reminder, I just need a list somewhere that doesn't get lost in the paperwork covered pile I call my desk. What to do, you ask? The Tasks feature in Gmail has a handy way to solve this problem.
If you are unfamiliar with the Tasks feature in Gmail, see my Keeping Track of Tasks with Google Apps post about how to set up and use the Tasks feature.
As I showed in that post, you can create multiple tasks lists. So why not create one for each day? By clicking on the little bulleted list icon in the bottom right hand corner of the tasks window, you will bring up a list. You can choose "New list" to make your lists and then just click on the list name to switch to it.

As I showed in that post, you can create multiple tasks lists. So why not create one for each day? By clicking on the little bulleted list icon in the bottom right hand corner of the tasks window, you will bring up a list. You can choose "New list" to make your lists and then just click on the list name to switch to it.
Every morning when you boot up your computer and sign into your email, switch your Tasks list to the right day of the week. So simple!
Thanks for stopping by TeachingTechNix! I hope to have another handy tech tip for you soon.
Friday, June 6, 2014
Keeping Track of Tasks with Google Apps
Most teachers have a to do list a mile long. In my case, I used to have about 30 sticky notes scattered all across my desk with all the little things I need to remember to deal with. Then when I got home and actually had 5 minutes to do something, that list did me no good scattered all over my desk at school. Google has a cool feature that helped me with this very problem. Tasks!


Adding a Task
You can click on the yellow bar next to the small square to type in your first task. Once you finish typing, just hit enter to save the task. It will automatically pop up a new little square so you can add the next task when you are ready.


Accessing the "Tasks" Window
When you have your Gmail inbox in front of you, you will see the word "Mail" in red just under the colored Google logo in the top left corner of your browser window. You'll notice that there is a small red triangle next to it pointing downward. This indicates that there is a drop down of some sort. If you click on the word "Mail", a menu will show. It will give you three options - Mail, Contacts, and Tasks.
When you click on "Tasks", a little Tasks window will pop up in the bottom right hand corner of your browser window.
Adding a Task
You can click on the yellow bar next to the small square to type in your first task. Once you finish typing, just hit enter to save the task. It will automatically pop up a new little square so you can add the next task when you are ready.
Checking Off a Task
Once you complete a task, you can simply check the box to show that it is completed.
Adding Another List
One cool feature is that you can have more than one list. By default it will say "<Insert your name>'s List". You can rename this list, and even create other lists, by clicking on the little button in the bottom right that looks like three bullet points.
When you click on the "New list" option it will pop up a small window asking you to name your list. I named mine Veteran's Day to show one reason why you may want a separate list. Our school does a big Veteran's Day celebration for the community every year and there are many things to do to prepare. I can use a separate task list to manage the tasks associated with this event.
Once you hit ok after naming your list, the new list is opened. To switch back and forth between lists, click the little button with the three bullets again and it will allow you to choose which list you would like to see.
Clear Completed Tasks
If you click the "Actions" menu at the bottom of the window, you can do a number of things, one of which is to clear away the completed tasks.
Adding Details to a Task
Something else you can do from this menu is edit the details of your task. If you choose "Edit details" from the menu you will be able to add a due date, add notes, or even move this task to a different list. You can get to the same add details screen by mousing over the task and clicking on the little black arrow that shows up on the right side of the task.
When you add a due date, the little date will appear under the task title on your list.
Changing the Order of Tasks
To change the order of a task, you could use the actions menu, but the easiest way is to mouse over the task and click on the little dotted area that appears at the left side of the task. You will get a gripping glove icon when you mouse over that area. Just click and drag that task into the position you want it to be in. Note: Due dates do not seem to affect the order of your tasks.
Deleting a Task
To delete a task, you can simply check it off and then clear completed tasks, or you can select the task and click on the little trash can icon at the bottom of the window.
Managing the Tasks Window
You can minimize the window within the gmail screen by clicking on the minus sign in the upper right corner of the Tasks window. You can also pop the tasks window out so it becomes its own window instead of living inside your gmail window. You can do this by clicking on the little arrow icon next to the minus sign. You can also close the window by clicking on the X.
If you do pop the window out, you can pop it back in by choosing the "Pop-in" option at the bottom right corner of your new tasks window.
I hope the task list will come in handy for you. It sure has made a big difference for me.
To read my post about using tasks to make daily reminder lists - click here.
Thank you for stopping by TeachingTechNix! Stop by soon for another handy tech tip.
Subscribe to:
Posts (Atom)