Google Forms is a digital form and survey tool. It allows you to gather, organize, analyze, and manipulate data. Put very simply, you create questions, give people the web address to your form, and sit back while Google automatically compiles the data into a nice spreadsheet for you. This is a pretty powerful app, and it has many unique features. In this post, I'm just giving you the basics of what it can do.
To create a Google Form, you just navigate to your Google Drive and click on the red "New" button and then choose "Google Forms". If Google Forms doesn't show up in the list, choose the "More" option at the bottom and it should show. (If you are still using the old Google Drive, you will click the red "Create" button and then chose "Form".) You can also just type forms.google.com into your address bar, which will open up a new form automatically.

The first thing I recommend is to give your form a title. You can do this by editing the bold "Untitled form" text you see at the top of the second section that comes up on your screen. You can also click the very top left of your form where it says, "Untitled form" and that will prompt you for a new title. When you edit one of these places, it will change them both. (I've noticed that if I edit my form title later on, it doesn't update in both places. If you change your title later, you may want to check both spots.)

Now let's look at the settings at the top of your form. If you are using a Google account that is tied to an organization - a school or other workplace - you will have 5 options here. If you are using a personal Google account, you will only see 3. I'm going to go over all 5 here since most of you probably have Google Apps for Education accounts.
Organization

Personal

The first option will say "Require _____ login to view this form", the blank being your organization's name. This gives you the option to only allow people from your organization to see and fill out your form.
The second option will say "Automatically collect respondent's ________ username", again the blank being your organization's name. This will automatically log the username of the person filling out the form without them having to identify themselves as an answer to one of your questions. This only works on users from your organization.
The third option allows you to show a progress bar at the bottom of the page so that the person taking the survey will know how far along they are in the form.
The fourth option allows you to limit each person to one response. They will have to have a Google account for this to work. It will require them to log in, but will not automatically record their username. (It will still collect their user name if they are in your organization and you checked the box for option number 2.)
The last option allows you to shuffle the question order. That means the question order within each page (you can have more than one page of questions) will shuffle randomly. Not to worry, your answers will still be neatly organized in your response spreadsheet.
You can choose which settings you want depending on the purpose and audience of your form.
The next section you see will have your form title, a place for a form description, and then your first question. You don't have to include a form description, but it is there if you chose to use it.

You have several different question types you can choose from. To change the question type, just click the drop down next to Question Type and pick the one you want from the list.
The options (seen on right) are pretty self explanatory, but you can play with them to figure out what they each do. The most common ones I use are Text (for short answer), Paragraph text (for longer answer), Multiple choice, and Choose from a list.
Type in your question or prompt where it says Question Title. If you choose to include help text, it appears a little smaller under the question. It can be an example or further explanation on how they should answer the question. If you chose Multiple Choice or Choose from a list, it will give you a place to type in each of the options. Just a tip, I tend to use Choose from a list if I want to do a yes/no or true/false question.
You also have the option to make the question a required question. This means that they cannot submit the form until they answer the questions you have marked as required. When you are all done with your question, click "Done".

If you are reading this post, you are probably fairly new to Google Forms. At this point, I wouldn't worry about the advanced settings. That is all about data validation which helps you limit what type of information can be entered in as the answer. I'll delve into that in a future post when I go into more of the finer details of what Google Forms can do.
In the upper right hand corner of the question box, you will notice three symbols - a pencil, two little papers, and a trash can.

The pencil is what you click when you want to edit a question. If you click it while you are already editing the question, which we are in the view you see in the pictures, it does nothing. If you click it when you aren't editing that specific question, it will open up the options so you can edit it again.
The two little papers will allow you to duplicate the question. If you are making more than one of the same type of question, you can always click the duplicate button and then just edit the text of the second copy.
The little trash can will delete the question.
You'll notice right under the question box, you will see an Add item button.

If you hit the part that says "Add item", you will get another item that is the same type of item as what you just edited. So if you have a multiple choice question, it will add another multiple choice question. If you have an image, it will add another image, etc. If you click on the little down arrow next to "Add item" you will get a menu for all the types of items you can add. It has all the question types, as well as the other items you can add to your form.

Once you are done adding questions/items to your form, you will want to take a look at the Confirmation Page settings at the bottom of your form.

The little text box is where you can type the message you want your responders to see after they submit their form. You can also check the boxes to show a link to give another response, give responders a link to see a summary chart of all the responses, or allow them to edit their responses after they submit. You can choose these based on the purpose of your form.
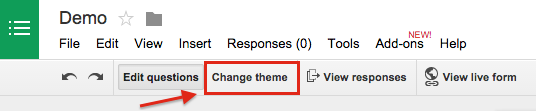
Before you send out your form, you will want to choose a theme. The theme is the pictures or colors that make your form look nice. Across the top of the page you will see some options. Click on "Change theme" and you can choose the one you like best from the pane that opens on the right hand side of your screen. After you choose the one you want, click "Edit questions" right next to where you chose "Change theme" to get rid of that sidebar theme menu.
You will also want to choose a destination for your responses. If this is your very first Google Form, when you click on the "View responses" button across the top, you will get a window asking you to name the response document. By default, it will send all of the responses to a Google Spreadsheet titled the same thing as your form, followed by the word "Responses" in parenthesis. So if my form is called Parent Feedback, then my answer spreadsheet will be called Parent Feedback (Responses). You can change the title if you wish. Notice the little "Always create a new spreadsheet" option in the picture. That is checked by default. Next time you create a form, it will automatically create the spreadsheet, and when you click "View responses" it will take you directly to the spreadsheet without asking you about naming it. If you uncheck that box before you hit "Create", it will ask you again the next time. You can also choose to keep the responses only in Forms. Honestly, I've never done that, so I'm not sure what that would look like. I don't see why you would want to keep them in Forms, as the spreadsheet makes it easy to analyze your data.
Once you hit "Create", it will create the spreadsheet and open it up for you. Then you can just pull up that spreadsheet from your drive anytime you want to see the results. You can share the spreadsheet with other people if you would like them to see the results as well.


If you'd like to take a look at how your finished form will look before you send it out, or at any time during the creation process, you can click on the "View live form" button in the menu bar next to "View responses". This will take you to your form and show you exactly what everyone will see when they go to fill it out.

When you are all finished creating your form, you can click "Send form" and get some options on how to distribute the form. You can copy the link, embed it somewhere, share out via Google+, Facebook, or Twitter, or send the form through email by typing in email addresses in the box. If you would like to add a collaborator by sharing the form with someone else so they can help you edit it, there is a link to do so from this screen as well.

I normally just post the link to my form on a website or in an email for people to click on. All Google Form urls are really long and complicated. It looks messy to send out the long link, so I tend to just hyperlink a word. This means to take a word and turn it into a link for people to click on to take them to a site. If you need help learning how to hyperlink a word, leave me a comment and I can help you.
If I'm giving a presentation or sending out a paper flyer, I'll do a shortened URL for people to type in. If you are not familiar with what a shortened URL is or how to make one, see my post about it by clicking here. Google went ahead and put in the little "Shorten URL" check box for you right under the share link. If you click on it, it will give you a goo.gl short URL. Pretty handy if you ask me!
This was just the basics, but hopefully it gave you all the information you needed to create your first Google Form. My students are using Forms almost on a daily basis. I have a whole series of blog posts lined up for you on how you can use Google Forms in the classroom. The links are listed below.
Parent Surveys with Google Forms
Organize Parent Conference Notes with Google Forms
Review and Discussion Activities with Google Forms
Thank you for stopping by the TeachingTechNix blog! I hope you found it helpful. Stop by again soon for some more handy tech tips!
Now let's look at the settings at the top of your form. If you are using a Google account that is tied to an organization - a school or other workplace - you will have 5 options here. If you are using a personal Google account, you will only see 3. I'm going to go over all 5 here since most of you probably have Google Apps for Education accounts.
Organization
Personal
The first option will say "Require _____ login to view this form", the blank being your organization's name. This gives you the option to only allow people from your organization to see and fill out your form.
The second option will say "Automatically collect respondent's ________ username", again the blank being your organization's name. This will automatically log the username of the person filling out the form without them having to identify themselves as an answer to one of your questions. This only works on users from your organization.
The third option allows you to show a progress bar at the bottom of the page so that the person taking the survey will know how far along they are in the form.
The fourth option allows you to limit each person to one response. They will have to have a Google account for this to work. It will require them to log in, but will not automatically record their username. (It will still collect their user name if they are in your organization and you checked the box for option number 2.)
The last option allows you to shuffle the question order. That means the question order within each page (you can have more than one page of questions) will shuffle randomly. Not to worry, your answers will still be neatly organized in your response spreadsheet.
You can choose which settings you want depending on the purpose and audience of your form.
The next section you see will have your form title, a place for a form description, and then your first question. You don't have to include a form description, but it is there if you chose to use it.
You have several different question types you can choose from. To change the question type, just click the drop down next to Question Type and pick the one you want from the list.


The options (seen on right) are pretty self explanatory, but you can play with them to figure out what they each do. The most common ones I use are Text (for short answer), Paragraph text (for longer answer), Multiple choice, and Choose from a list.
Type in your question or prompt where it says Question Title. If you choose to include help text, it appears a little smaller under the question. It can be an example or further explanation on how they should answer the question. If you chose Multiple Choice or Choose from a list, it will give you a place to type in each of the options. Just a tip, I tend to use Choose from a list if I want to do a yes/no or true/false question.
You also have the option to make the question a required question. This means that they cannot submit the form until they answer the questions you have marked as required. When you are all done with your question, click "Done".
If you are reading this post, you are probably fairly new to Google Forms. At this point, I wouldn't worry about the advanced settings. That is all about data validation which helps you limit what type of information can be entered in as the answer. I'll delve into that in a future post when I go into more of the finer details of what Google Forms can do.
In the upper right hand corner of the question box, you will notice three symbols - a pencil, two little papers, and a trash can.
The pencil is what you click when you want to edit a question. If you click it while you are already editing the question, which we are in the view you see in the pictures, it does nothing. If you click it when you aren't editing that specific question, it will open up the options so you can edit it again.
The two little papers will allow you to duplicate the question. If you are making more than one of the same type of question, you can always click the duplicate button and then just edit the text of the second copy.
The little trash can will delete the question.
You'll notice right under the question box, you will see an Add item button.
If you hit the part that says "Add item", you will get another item that is the same type of item as what you just edited. So if you have a multiple choice question, it will add another multiple choice question. If you have an image, it will add another image, etc. If you click on the little down arrow next to "Add item" you will get a menu for all the types of items you can add. It has all the question types, as well as the other items you can add to your form.
Once you are done adding questions/items to your form, you will want to take a look at the Confirmation Page settings at the bottom of your form.
The little text box is where you can type the message you want your responders to see after they submit their form. You can also check the boxes to show a link to give another response, give responders a link to see a summary chart of all the responses, or allow them to edit their responses after they submit. You can choose these based on the purpose of your form.
Before you send out your form, you will want to choose a theme. The theme is the pictures or colors that make your form look nice. Across the top of the page you will see some options. Click on "Change theme" and you can choose the one you like best from the pane that opens on the right hand side of your screen. After you choose the one you want, click "Edit questions" right next to where you chose "Change theme" to get rid of that sidebar theme menu.
You will also want to choose a destination for your responses. If this is your very first Google Form, when you click on the "View responses" button across the top, you will get a window asking you to name the response document. By default, it will send all of the responses to a Google Spreadsheet titled the same thing as your form, followed by the word "Responses" in parenthesis. So if my form is called Parent Feedback, then my answer spreadsheet will be called Parent Feedback (Responses). You can change the title if you wish. Notice the little "Always create a new spreadsheet" option in the picture. That is checked by default. Next time you create a form, it will automatically create the spreadsheet, and when you click "View responses" it will take you directly to the spreadsheet without asking you about naming it. If you uncheck that box before you hit "Create", it will ask you again the next time. You can also choose to keep the responses only in Forms. Honestly, I've never done that, so I'm not sure what that would look like. I don't see why you would want to keep them in Forms, as the spreadsheet makes it easy to analyze your data.
Once you hit "Create", it will create the spreadsheet and open it up for you. Then you can just pull up that spreadsheet from your drive anytime you want to see the results. You can share the spreadsheet with other people if you would like them to see the results as well.
The spreadsheet will have the questions you asked across the top of the spreadsheet, each question in a different column. Your responses will come up each as a new row and will include a timestamp so you can see when they responded. Below is an example of an answer spreadsheet for a multiple choice form. You'll notice I hid column B so that my student's names don't show.
When you are all finished creating your form, you can click "Send form" and get some options on how to distribute the form. You can copy the link, embed it somewhere, share out via Google+, Facebook, or Twitter, or send the form through email by typing in email addresses in the box. If you would like to add a collaborator by sharing the form with someone else so they can help you edit it, there is a link to do so from this screen as well.
I normally just post the link to my form on a website or in an email for people to click on. All Google Form urls are really long and complicated. It looks messy to send out the long link, so I tend to just hyperlink a word. This means to take a word and turn it into a link for people to click on to take them to a site. If you need help learning how to hyperlink a word, leave me a comment and I can help you.
If I'm giving a presentation or sending out a paper flyer, I'll do a shortened URL for people to type in. If you are not familiar with what a shortened URL is or how to make one, see my post about it by clicking here. Google went ahead and put in the little "Shorten URL" check box for you right under the share link. If you click on it, it will give you a goo.gl short URL. Pretty handy if you ask me!
This was just the basics, but hopefully it gave you all the information you needed to create your first Google Form. My students are using Forms almost on a daily basis. I have a whole series of blog posts lined up for you on how you can use Google Forms in the classroom. The links are listed below.
Parent Surveys with Google Forms
Organize Parent Conference Notes with Google Forms
Review and Discussion Activities with Google Forms
Thank you for stopping by the TeachingTechNix blog! I hope you found it helpful. Stop by again soon for some more handy tech tips!


