The biggest thing that makes labels better than folders, is that you can put as many labels as you want on one email. With a folder system, an email can only be in one folder. Gmail allows you to create labels - up to 5,000 - and even make sub-labels. You can name your labels whatever you like and also color code them.
Creating a New Label
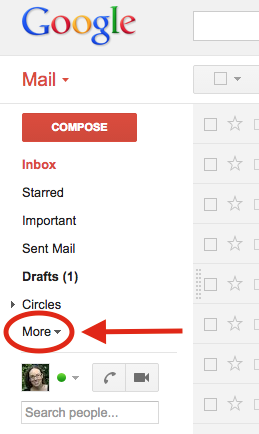
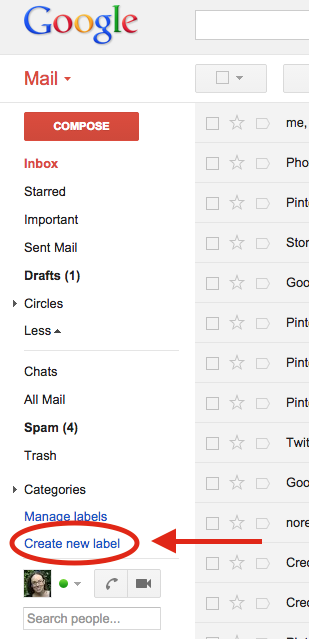
To create a label, find "Create new label" in the list under the red "Compose" button down the left side of your inbox. It will be pretty far down the list. Chances are you will need to click the "More" option before "Create new label" will show.
To create a label, find "Create new label" in the list under the red "Compose" button down the left side of your inbox. It will be pretty far down the list. Chances are you will need to click the "More" option before "Create new label" will show.
 -
-
You'll get a pop up window asking what you'd like to name your label. Once you type the name of your label, you can hit the "Create" button. If you want this label to be a sub-label, you can click the box next to "Nest label under:" and then use the drop down to choose the label you wish to create it under. One example for how you might use the sub-label feature is with parent emails. You may want to create a "14-15 Parent Emails" folder and then sub-labels might be things like "Sent", "Received", "Meetings", "IEP", etc.

Once you hit create, you should see your label appear in the list down the left side of your inbox. You may have to click the "More" button to see your label in the list.

Managing Your Labels
You can control which labels show up in this list. To access those settings, click on "Manage labels" in the list right above where you clicked to create your label.

You can also get to these options by clicking on the little gear button on the upper right side of the inbox screen and choosing "Settings" and then click "Labels" from the options across the top of the screen.
Now you can choose to show or hide each label - even the Gmail created ones! You'll have to scroll all the way to the bottom of the list to see the ones you have created.

Applying a Label to an Email
There are two ways to apply a label to an email. You can do it by checking the box to the left of the email to select it, or by opening the email. Either way, you will then see a little label button appear across the top of the screen. It looks like a little tag. If you click on this button, it will allow you to select a label. If you do not see the label you created in this list, simply start typing the name of your label into the search box and you will be able to select it. Once you select it once, it should show up in that list each time you click the label button. You'll see that you can create new labels and access your label settings from this list as well.

Once you select the label you want, you will see an "Apply" button appear at the bottom of the label list. Click on "Apply" and your email is now labeled.

You will now see the label appear on your email in the inbox list.
Remember, you can apply as many different labels to an email as you wish.
Color Coding Your Labels
You can change the color of your labels, as well as access some of the settings we've already discussed, by mousing over your label name down the left side of the inbox and clicking on the little down arrow that appears just to the right of the label.

When you change the label color, it will always make the label with that name in the color you chose. If I changed the Tech Stuff label to be blue, it will always show up in blue.

Accessing Labeled Emails
*UPDATE* If you select an email in your inbox and click and drag the email into one of the labels on the left side navigation list, it will automatically archive your email and label it so it no longer shows in your inbox. You can also select the "Move" option and choose a label which will do the same thing.

If you want to see all the emails you have placed under a specific label, weather they have been archived or not, click the name of the label in the list down the left hand side of your inbox.
You can do a Gmail search specifically for emails with a certain label by typing "label:" followed by the name of your label, into the search bar across the top of your inbox. For example, if you know you had an email from Sam about homework that you labeled with the "Parent Emails" label, then you can do a search like this:

To read more about harnessing the power of the Gmail search bar, read my post on Searching in Gmail.
Well, there you have the basics of labeling. Go ahead and give it a try!
Thank you for stopping by the TeachingTechNix blog! Drop by again soon for more handy tech tips!
No comments:
Post a Comment
Thank you so much for taking the time to leave a comment!