I returned from the annual CUE (Computer Using Educators) conference on Saturday afternoon. It is now Wednesday evening, and my brain is still spinning. I have so many great things I could tell you about! From tips and tricks, to apps and web tools, I learned some really fun stuff. As amazing as all those things are, it isn't what I want to focus on for this post. Many of those cool tips, tricks, and web tools I will tell you about in later posts, but for today, I want to focus on my biggest takeaway.
The overarching idea, the thing that had attendees buzzing in the hallways is the shift that is beginning to occur in education. Some are fully engaged and others are knee deep, but most teachers are still standing around the edges of the water, not even daring to dip a toe into the educational shift that is rising. Something that we've been talking about for a while now, is that our kids are different. The world they are growing up in is quite different from the world most teachers grew up in. We are preparing students for jobs that don't even exist yet. How is it that we plan to prepare these leaders of tomorrow with the education system of yesterday? I am not saying that everything about that system is wrong, because I don't believe it is, however I do believe that the needs of our students today are very different from the needs we all had as students.
This brewing trend is seen as a shift away from feeding students large amounts of information and asking them to memorize it. All the information they could ever need is available to them at the touch of a button or the click of a mouse. We need to teach students to utilize this wealth of information in an appropriate way. We need to teach them to tell good information from bad. They need to learn to collate information and to apply it effectively. They need to learn to collaborate and create, to be producers and not just consumers, to think critically and design purposefully. Our students need us to engage them and to inspire them, to jump into the trenches and learn alongside them. Are you ready?
The biggest thing I walked away with is the simple, yet not even close to easy, command of "Take a Risk". It is easy to have conversations about all of this and think, "Yeah, this is great! When I have some time I'll..." or "Next year I can...". The time is now. Take a risk. Today, tomorrow, next week, or next month, just make sure it is sooner than later. Start small. Change one lesson, one unit, one subject. Add something new. Instead of requiring your students to write the same old 5 paragraph essay, let them pick the way they would like to show you evidence of their learning. Instead of reading the Science or Social Studies text one day, ask students the big question of the lesson and let them research in groups to answer it. Give them a time frame and make them present in some fashion what they learned. Flip a lesson or even a chapter. Start a genius hour or 20% project. Maybe your risk for today is just Googling flipping the classroom, genius hour, and 20% project to figure out what they are. Start somewhere, anywhere. Start now. Take a risk.
I took a risk and changed up a lesson on Monday. It worked pretty well. That doesn't always happen. Don't be afraid to fail. If we never model failure for our students, failure will devastate them instead of inspire them to do better the next time. If you try something and it doesn't work, try something else. Maybe even involve your students in conversations about what worked and what didn't and take their suggestions for how to make it better. Taking a risk is just that, a risk. You are educators, you know yourselves and your students, and you probably have a pretty good idea of how something will work. I'm not suggesting you go off the deep end and try something extremely crazy that has little chance of success. Do what you do best in the classroom, but take a little risk now and then. Your students are worth it.
Thank you for stopping by the TeachingTechNix blog. Stop by again soon to hear about some of the neat tips, tricks, apps, and web tools I mentioned. I can't wait to share them with you!
Wednesday, March 25, 2015

Sunday, March 15, 2015
Drinking From a Firehose - iPad Summit Day 2
I was so worn out after "drinking from the firehose" for two days, that I didn't get this post written on day 2 of the conference. Better late than never though, right? If you missed my Drinking From a Firehose - iPad Summit Day 1 post, click here to read it.
Day 2 Takeaways
The big ideas remained the same as day 1, so I'll focus here on some of the little things that stuck out to me.
- Be risk takers. It is ok to try something new in the classroom that you think might be really wonderful for student learning, only to find out that it was a bust. Kids didn't take to it like you thought, or maybe the technology didn't work the way you wanted it to. It's ok! We can't be great innovators and change-makers without making some mistakes along the way. Involve the kids in that journey. Let them know that you are going to try something out together. Let them help you decide if the lesson or project is a keeper or not. They LOVE to feel like they are taking part in the design of the classroom.
- Beth Holland is an instructor with EdTechTeacher and she is a really great speaker. I went to a session with her called Reading, Writing, and Devices. She talked about how some people are ready to throw out paper and move completely digital, while others are complaining about kids having so much screen time. Paper is great! It has served us well over the years. It still does. Some things are just better on paper. Electronics are amazing and wonderful and can do really incredible things and kids can create some spectacular products. Regardless of what you are doing and how, you need to find balance between the process and the product. Both are important! Ask yourself, is this activity/project/product appropriate? Is it meaningful? Is it empowering?
- You don't have to be a "techy" person to utilize technology well in your classroom. The students are our biggest untapped resource. They will be more than happy to help you figure out a technology. Give them 5 minutes with it, and they very well may know more about it than you, even if you've been playing with it for 3 months. Don't be afraid to let them help you figure stuff out. Find something you want to try. Become familiar enough with it to run your lesson or launch your project, and let them help you if you encounter issues along the way.
Apps
Plickers is really great for a low tech classroom. If you are in a situation where your students don't have access to devices and you would like to use a student response system, this is for you! This is a website and an app. You sign up for free - the app is free too - and set up your activity. You can also do impromptu questions. You print "paper clickers" which are all different shapes and work sort of like QR codes. The students hold them a certain way to designate A, B, C, D, True, False, Yes, No type responses. You simply scan the room with your iPhone, iPad, or Android device and it inputs the answers. Each person has their own "paper clicker" so you can even know who answered what. Very simple solution if your students don't have devices.
Classkick is a free iPad app. It allows you to create lessons and activities that include text, video, audio, photos, etc. As the teacher you can see each child's progress individually and in real-time as they work on it. Sounds very cool. Makes me wish I had 1:1 iPads.
Web Tools
Kahoot is for game based learning. It allows you to make quizzes, discussions, or surveys and your students can participate from any device that has internet access. They can rack up points by answering quickly and correctly and compete against one another. Your results are stored for you. You can even save the results right to your Google Drive. We did one in a session and I have to admit, it was pretty fun. I'll be using this in class for sure.
Socrative is one of my favorite tools. It is also an App (all free), but my students are on Chromebooks so they just access it via the web. I first learned about this from Jen Roberts. She did a post about it on her blog, LitandTech.com. You can read it here. It is a way to give your students quizzes, short answer questions, exit tickets, tests, etc. The students just browse to a webpage, or use the app, and type in a room code to access the activity you have created. I love it especially for the voting feature that it has. After students submit answers, you can hide the names of who submitted the answers and then ask the students to vote on their favorite. Jen used this in her class as you can see in her blog post. I used it in the same way, only scaled down for the 3rd graders and they LOVED it.
Zaption is a website where you can turn online videos into interactive activities. I haven't used this yet myself, but it definitely seems worth checking out. You can insert questions into videos and require students to answer them as they watch. Zaption is free.
EDpuzzle is similar to Zaption in that it allows you to add things to a video. You can crop video, add voiceovers or audio notes, and add questions along the way. Like Zaption, it is also free.
Club Academia is a website where students make tutorials for students. Pretty neat.
MathTrain.tv is another site where kids make instructional videos for other kids.
Well, there it is - Day 2 things to remember! I hope you found something you can use in your classroom. Thank you for stopping by the TeachingTechNix blog!
Tuesday, March 10, 2015
Free High-Resolution Photos with Unsplash
My new favorite website is Unsplash. I was working on a Google Slides presentation for a training I was holding and came across this amazing website while I was searching for pictures. It is a website full of high-resolution photos that you can do whatever you want with - no attribution or special permissions necessary. They add 10 new photos every 10 days. The best part is that they are free!


You can use these photos for presentations, flyers, even writing prompts for your students. Here are a few examples of the beautiful pictures that were recently added to the site.
Gorgeous, right?! Beautiful pictures for download, free of charge, no attribution. It doesn't get any better than that.
Thank you for stopping by the TeachingTechNix blog. See you next time!
Tuesday, February 10, 2015
Drinking From a Firehose - iPad Summit Day 1
I spent the day at the EdTechTeacher iPad Summit in San Diego and will return for another full day tomorrow. Driving home tonight in the quiet of my car, I could almost hear the neurons firing in my brain. I was feeling that wonderfully inspiring, yet at the same time exhausting, post-conference buzz of information overload. My husband works in technology and he often attends big tech conferences. When I call him and ask how it is going, "I feel like I am drinking from a firehose" is among the responses I usually get. This analogy is very fitting to how I feel today. So much information is being fired at you all at once and you feel like you come home with only bits and pieces of the good stuff. There is too much to get it all down and remember it all. I find in that moment, when you are left drenched from the firehose of great tips, tools, and lesson ideas - immediate reflection is critical.
Today's post isn't a specific tip or trick. I know it is straying a little bit from my pattern here on the TeachingTechNix blog, but I feel there is value in it. My principal and school administrators are amazing and I am given the opportunity to attend conferences like this a few times each year. I owe it to them, to my colleagues, and to myself to get the most out of these experiences as I can. Part of that is bringing back all the goodness to share. Since I started this blog for the colleagues at my school site, but for all of you as well, I figured a blog post as a reflection was fitting. I want to share a few overarching themes I came away with as well as some neat tools and apps that I was introduced to today. I left with my brain spinning and I hope that reading this post can help get your brain buzzing as well.
The Big Ideas
The big idea that seemed threaded throughout every session I went to today was about student creation. Allowing students some choice and allowing them to show their understanding in a way that makes sense for who they are. Shawn McCusker lead a session titled "Unleashing Creativity", but said he could have also called it "Unleashing Identity". Giving students the option to showcase their learning in a way that allows their unique voice to shine through gives you a glimpse of the mind, and often heart, of a child that you never would have had otherwise. Giving students the opportunity to demonstrate their understanding in a meaningful way takes the learning to a whole new level. That meaningful piece is important, too. How can they take what they have learned and impact their school, their communities, their world in some way? The wheels in my brain just start turning like crazy when I think about this.
Another thing that was discussed today was if you are sharing student work, which I think you should be, who is the audience? Your own class? Your school? Parents? The whole World Wide Web? Be purposeful about who you share student work with. Think carefully about sharing work and be sure it is careful and meaningful. Shawn McCusker led a thought provoking session discussing this.
Something else I heard a lot about, was showcasing the end products that kids are creating, but also being sure to showcase the learning process itself. There is so much that is lost if we only see the end product. The learning happens in the midst of the process and value should be placed on the journey, not just the destination. Kelly Scholten led a great discussion talking about process portfolios.
Makes complete sense that we would be talking student creations at an iPad Summit. iPads are amazing tools for easily creating video, eBooks, audio, blogs, etc., no matter what the age of your students. That saying..."There's an app for that"...well, it happens to be true! There is an app for that, I can almost guarantee it! I was a little worried about attending the conference because we don't have 1:1 iPads in our classrooms, in fact we only have one iPad per classroom and it is the one assigned to the teacher. Kindergarten has 6 iPads per classroom, and the rest of us have Chromebooks. I'm still glad I went. I feel that the overarching idea is something I can take value from and my kids can use the devices I do have, along with my one iPad to create amazing things.
Apps
Speaking of apps, I was introduced to several cool ones today that I want to share with you. Some of these apps I have heard of before and maybe even used, but many of them are new to me. I can't guarantee they are the best apps out there, but someone who presented today uses them and loves them enough to recommend them, so I figure they are worth passing along.
Paper 53 - Free - Sketching/Note Taking
This app I have known about for a long time. I've been wanting to use it but I didn't want to pay for the individual art tools. Now the app and the tools are free! I used it today to take notes and I LOVED it!! It is my new favorite note taking app so I figured I'd share it with you. I'm NOT an artist by any stretch of the imagination, but I tend to be a little bit of a doodler when I'm taking notes. This gave me an outlet for that doodling urge with beautiful results. Here is one of my notes pages from a session I had with Jodie Deinhammer. She is phenomenal by the way.

Photo Editor by Aviary - Free (has in-App purchases)
I've never used this one, but it came highly recommended.
Explain Everything - $2.99 - An interactive whiteboard and screencasting tool (recording what is happening on your screen along with voiceover)
I haven't used it yet, but I have heard great things about this app before, and today someone said they have teachers tell them that if there was only one app they could have on their iPads in the classroom, it would be this one.
Draw and Tell - $1.99 - A creative tool for kids to draw and create and record their voices.
I have not used this App, but it was recommended because it allows kids to first make their drawings and then do the recording. Some other apps require the kids to do this simultaneously, which can be tricky for younger kids. I haven't used it, but it came highly recommended.
Book Creator - $4.99 (There is a free version) - Students can create their own iBooks using video, audio, text, photos, drawing, etc.
I played with the free version briefly today. Seems pretty intuitive and easy for all ages.
Popplet - $4.99 - Allows you to capture and organize your ideas
Haven't used this one. Seems handy for pre-writing and outlining. Neat way for kids to take notes or showcase learning even.
Skitch - Free - Take a picture and add annotations
I've actually used this one and I like it a lot. I use it to take pictures of student work and discuss it on the board, especially in math. It is nice for students to be able to explain their thinking about something or use a picture with annotation to display their learning.
Web Tools
PowToon - Create animated videos and presentations
I haven't used this one, but I saw a presentation that was created with PowToon and I was impressed. I am definitely going to play with this one.
BulbApp - This appeared to be a type of blog space for kids (or you) to publish your work for people to access. I only saw it briefly, but it looked neat.
Thinglink - A website that allows you to take an image and make it interactive. People can click in certain places and get explanations via text, audio, video, etc. This seems really cool and I'll be checking it out for sure.
Padlet - On online bulletin board of sorts, but collaborative. The examples that were given were students creating a padlet to display learning, or teachers having students all posting on a board to create discussion or even an exit ticket type activity. I haven't used it yet.
Shoutkey - Shoutkey allows you to create a shortened URL. If you need to know more about what a short URL is, read my post here. Shoutkey does the same thing as goo.gl, but it makes a simple link using a word instead of an alphanumeric code that can sometimes be tricky to type in.
Well, I think that wraps up my reflection for day 1. I'm looking forward to day 2 tomorrow! I'll post another reflection tomorrow night.
Thank you for stopping by the TeachingTechNix blog! I hope you found something that got your brain buzzing and those neurons firing!
Today's post isn't a specific tip or trick. I know it is straying a little bit from my pattern here on the TeachingTechNix blog, but I feel there is value in it. My principal and school administrators are amazing and I am given the opportunity to attend conferences like this a few times each year. I owe it to them, to my colleagues, and to myself to get the most out of these experiences as I can. Part of that is bringing back all the goodness to share. Since I started this blog for the colleagues at my school site, but for all of you as well, I figured a blog post as a reflection was fitting. I want to share a few overarching themes I came away with as well as some neat tools and apps that I was introduced to today. I left with my brain spinning and I hope that reading this post can help get your brain buzzing as well.
The Big Ideas
The big idea that seemed threaded throughout every session I went to today was about student creation. Allowing students some choice and allowing them to show their understanding in a way that makes sense for who they are. Shawn McCusker lead a session titled "Unleashing Creativity", but said he could have also called it "Unleashing Identity". Giving students the option to showcase their learning in a way that allows their unique voice to shine through gives you a glimpse of the mind, and often heart, of a child that you never would have had otherwise. Giving students the opportunity to demonstrate their understanding in a meaningful way takes the learning to a whole new level. That meaningful piece is important, too. How can they take what they have learned and impact their school, their communities, their world in some way? The wheels in my brain just start turning like crazy when I think about this.
Another thing that was discussed today was if you are sharing student work, which I think you should be, who is the audience? Your own class? Your school? Parents? The whole World Wide Web? Be purposeful about who you share student work with. Think carefully about sharing work and be sure it is careful and meaningful. Shawn McCusker led a thought provoking session discussing this.
Something else I heard a lot about, was showcasing the end products that kids are creating, but also being sure to showcase the learning process itself. There is so much that is lost if we only see the end product. The learning happens in the midst of the process and value should be placed on the journey, not just the destination. Kelly Scholten led a great discussion talking about process portfolios.
Makes complete sense that we would be talking student creations at an iPad Summit. iPads are amazing tools for easily creating video, eBooks, audio, blogs, etc., no matter what the age of your students. That saying..."There's an app for that"...well, it happens to be true! There is an app for that, I can almost guarantee it! I was a little worried about attending the conference because we don't have 1:1 iPads in our classrooms, in fact we only have one iPad per classroom and it is the one assigned to the teacher. Kindergarten has 6 iPads per classroom, and the rest of us have Chromebooks. I'm still glad I went. I feel that the overarching idea is something I can take value from and my kids can use the devices I do have, along with my one iPad to create amazing things.
Apps
Speaking of apps, I was introduced to several cool ones today that I want to share with you. Some of these apps I have heard of before and maybe even used, but many of them are new to me. I can't guarantee they are the best apps out there, but someone who presented today uses them and loves them enough to recommend them, so I figure they are worth passing along.
Paper 53 - Free - Sketching/Note Taking
This app I have known about for a long time. I've been wanting to use it but I didn't want to pay for the individual art tools. Now the app and the tools are free! I used it today to take notes and I LOVED it!! It is my new favorite note taking app so I figured I'd share it with you. I'm NOT an artist by any stretch of the imagination, but I tend to be a little bit of a doodler when I'm taking notes. This gave me an outlet for that doodling urge with beautiful results. Here is one of my notes pages from a session I had with Jodie Deinhammer. She is phenomenal by the way.
I've never used this one, but it came highly recommended.
Explain Everything - $2.99 - An interactive whiteboard and screencasting tool (recording what is happening on your screen along with voiceover)
I haven't used it yet, but I have heard great things about this app before, and today someone said they have teachers tell them that if there was only one app they could have on their iPads in the classroom, it would be this one.
Draw and Tell - $1.99 - A creative tool for kids to draw and create and record their voices.
I have not used this App, but it was recommended because it allows kids to first make their drawings and then do the recording. Some other apps require the kids to do this simultaneously, which can be tricky for younger kids. I haven't used it, but it came highly recommended.
Book Creator - $4.99 (There is a free version) - Students can create their own iBooks using video, audio, text, photos, drawing, etc.
I played with the free version briefly today. Seems pretty intuitive and easy for all ages.
Popplet - $4.99 - Allows you to capture and organize your ideas
Haven't used this one. Seems handy for pre-writing and outlining. Neat way for kids to take notes or showcase learning even.
Skitch - Free - Take a picture and add annotations
I've actually used this one and I like it a lot. I use it to take pictures of student work and discuss it on the board, especially in math. It is nice for students to be able to explain their thinking about something or use a picture with annotation to display their learning.
Web Tools
PowToon - Create animated videos and presentations
I haven't used this one, but I saw a presentation that was created with PowToon and I was impressed. I am definitely going to play with this one.
BulbApp - This appeared to be a type of blog space for kids (or you) to publish your work for people to access. I only saw it briefly, but it looked neat.
Thinglink - A website that allows you to take an image and make it interactive. People can click in certain places and get explanations via text, audio, video, etc. This seems really cool and I'll be checking it out for sure.
Padlet - On online bulletin board of sorts, but collaborative. The examples that were given were students creating a padlet to display learning, or teachers having students all posting on a board to create discussion or even an exit ticket type activity. I haven't used it yet.
Shoutkey - Shoutkey allows you to create a shortened URL. If you need to know more about what a short URL is, read my post here. Shoutkey does the same thing as goo.gl, but it makes a simple link using a word instead of an alphanumeric code that can sometimes be tricky to type in.
Well, I think that wraps up my reflection for day 1. I'm looking forward to day 2 tomorrow! I'll post another reflection tomorrow night.
Thank you for stopping by the TeachingTechNix blog! I hope you found something that got your brain buzzing and those neurons firing!
Sunday, February 1, 2015
Organization Tip for Drive - File Names with Numbers
As a teacher, I tend to have many file or folder names that require numbers. I save all my weekly plans and number them all, week 1, week 2, etc. In my Google Drive, I have a folder with all my weekly math plans in it. With the way Drive puts numbered files in order, this is how it looked:


Rename your file so that it has two digits, the 0 being in front of your single digit. Then press "OK".


I hope you found this tip helpful. Thank you for stopping by the TeachingTechNix blog! Stop by again soon for more handy tech tips.
I was a bit frustrated that it didn't put them all in the correct order. Then I discovered how to solve the problem. I went through and renamed all my single digit weeks with a 0 in front of the single digit.
To rename your file or folder, click on the name to select the file and then click on the "More actions" button. That is the one with the three vertical dots. Then choose "Rename".
Once you do that with all your single digit files, you will have them all in order the way they should be.
Saturday, January 24, 2015
Save All Your Open Tabs
You are right in the middle of a big project. You have 15 tabs open in your Chrome browser, all of which you still need, and here comes an interruption. Your prep time ends, your kids get home, the baby wakes up, it's time to make dinner, or you realize it is way past your bedtime. Either way, you have a ton of open tabs and you don't want to lose any of them. The solution? Control-Shift-D.
Control-Shift-D (Command-Shift-D for Mac users) will take all the tabs you have open in your browser and put them in a folder on your bookmarks bar. Press the keys, name your folder, and click save. Just that easy and all your tabs are saved for later reference. Just a reminder that you need to be using Google's Chrome browser for this handy trick to work.
Let's say I'm planning a unit on Geometry for my 3rd graders. Here is what my screen might look like when my interruption comes along:

I press Control-Shift-D and up pops a little window. I type in the name for my folder and click ok.


Control-Shift-D (Command-Shift-D for Mac users) will take all the tabs you have open in your browser and put them in a folder on your bookmarks bar. Press the keys, name your folder, and click save. Just that easy and all your tabs are saved for later reference. Just a reminder that you need to be using Google's Chrome browser for this handy trick to work.
Let's say I'm planning a unit on Geometry for my 3rd graders. Here is what my screen might look like when my interruption comes along:
I press Control-Shift-D and up pops a little window. I type in the name for my folder and click ok.
Now, on my bookmarks bar I have my folder. When I click on it, all my tabs are saved as shortcuts.
Handy, right?
*If your folder doesn't appear across the top of your screen under the address bar (also know as the Omnibox), your bookmark bar may not be set to show. If you click on the settings icon (the three little lines in the top right corner of your browser), and then click on "Bookmarks", you can select the "Show Bookmarks Bar" option.
I have used this many times since I learned about it. I hope it will be helpful for you as well!
A few other Chrome keyboard shortcuts I've blogged about:
Control-F (Chrome Search Bar)
Control-Shift-T (Open Recently Closed Tabs in Chrome)
Control-Shift-N (Open a New Incognito Window) and Control-N (Open a new regular window)
Thank you for stopping by the TeachingTechNix blog! Stop in again soon for more handy tech tips!
Sunday, January 11, 2015
Labels in Gmail
The most common complaint I hear from people when they switch from Outlook to Gmail is that they miss the folder structure Outlook provides. It's true, Gmail doesn't have folders. Gmail does us one better - labels.
 -
-


When you apply a label to an email, it stays in the inbox with a little label added to it. It isn't removed from the inbox like it was in Outlook when you put it into a folder. If you don't want the email to show in your inbox list, you can archive it. Once archived, an email will show in the "All Mail" list, but not in your inbox. To archive an email, either select the email using the check box on the left, or open the email and then click the Archive button across the top of the screen. It looks like a little file folder. Your email will still be accessible to you during searches when it is archived.
*UPDATE* If you select an email in your inbox and click and drag the email into one of the labels on the left side navigation list, it will automatically archive your email and label it so it no longer shows in your inbox. You can also select the "Move" option and choose a label which will do the same thing.


The biggest thing that makes labels better than folders, is that you can put as many labels as you want on one email. With a folder system, an email can only be in one folder. Gmail allows you to create labels - up to 5,000 - and even make sub-labels. You can name your labels whatever you like and also color code them.
Creating a New Label
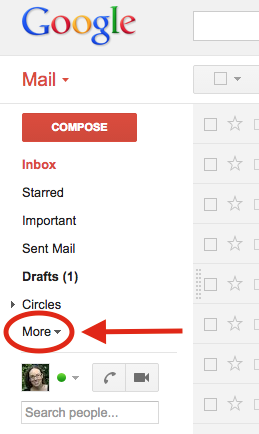
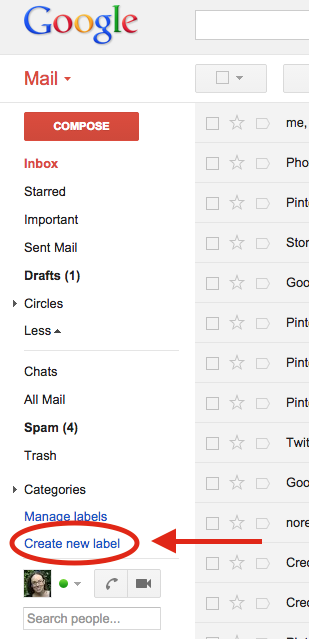
To create a label, find "Create new label" in the list under the red "Compose" button down the left side of your inbox. It will be pretty far down the list. Chances are you will need to click the "More" option before "Create new label" will show.
To create a label, find "Create new label" in the list under the red "Compose" button down the left side of your inbox. It will be pretty far down the list. Chances are you will need to click the "More" option before "Create new label" will show.
-
You'll get a pop up window asking what you'd like to name your label. Once you type the name of your label, you can hit the "Create" button. If you want this label to be a sub-label, you can click the box next to "Nest label under:" and then use the drop down to choose the label you wish to create it under. One example for how you might use the sub-label feature is with parent emails. You may want to create a "14-15 Parent Emails" folder and then sub-labels might be things like "Sent", "Received", "Meetings", "IEP", etc.
Once you hit create, you should see your label appear in the list down the left side of your inbox. You may have to click the "More" button to see your label in the list.
Managing Your Labels
You can control which labels show up in this list. To access those settings, click on "Manage labels" in the list right above where you clicked to create your label.
You can also get to these options by clicking on the little gear button on the upper right side of the inbox screen and choosing "Settings" and then click "Labels" from the options across the top of the screen.
Now you can choose to show or hide each label - even the Gmail created ones! You'll have to scroll all the way to the bottom of the list to see the ones you have created.
Applying a Label to an Email
There are two ways to apply a label to an email. You can do it by checking the box to the left of the email to select it, or by opening the email. Either way, you will then see a little label button appear across the top of the screen. It looks like a little tag. If you click on this button, it will allow you to select a label. If you do not see the label you created in this list, simply start typing the name of your label into the search box and you will be able to select it. Once you select it once, it should show up in that list each time you click the label button. You'll see that you can create new labels and access your label settings from this list as well.
Once you select the label you want, you will see an "Apply" button appear at the bottom of the label list. Click on "Apply" and your email is now labeled.
You will now see the label appear on your email in the inbox list.
Remember, you can apply as many different labels to an email as you wish.
Color Coding Your Labels
You can change the color of your labels, as well as access some of the settings we've already discussed, by mousing over your label name down the left side of the inbox and clicking on the little down arrow that appears just to the right of the label.
When you change the label color, it will always make the label with that name in the color you chose. If I changed the Tech Stuff label to be blue, it will always show up in blue.
Accessing Labeled Emails
*UPDATE* If you select an email in your inbox and click and drag the email into one of the labels on the left side navigation list, it will automatically archive your email and label it so it no longer shows in your inbox. You can also select the "Move" option and choose a label which will do the same thing.
If you want to see all the emails you have placed under a specific label, weather they have been archived or not, click the name of the label in the list down the left hand side of your inbox.
You can do a Gmail search specifically for emails with a certain label by typing "label:" followed by the name of your label, into the search bar across the top of your inbox. For example, if you know you had an email from Sam about homework that you labeled with the "Parent Emails" label, then you can do a search like this:
To read more about harnessing the power of the Gmail search bar, read my post on Searching in Gmail.
Well, there you have the basics of labeling. Go ahead and give it a try!
Thank you for stopping by the TeachingTechNix blog! Drop by again soon for more handy tech tips!
Subscribe to:
Posts (Atom)